รายการของคุณว่างเปล่า
เพิ่มสินค้าเพื่อขอใบเสนอราคา

A single pipetting error during coating or a wash step performed too quickly invalidates a whole 96-well plate – hours of preparation gone, sometimes weeks of samples.
The ELISA kit is the workhorse of quantitative immunoassay work, and its reliability is entirely based on how accurate you are with every step along the way.
Studies show that assay failures in research often stem from pre-analytical and analytical procedural gaps rather than defective reagents, which is why understanding the rationale behind every step matters as much as following the instructions.
This ELISA step-by-step protocol takes you through reagent setup to final data output, concentrating on common technical issues you’ll encounter, as well as providing you with the answers to fix them before they clear out your run.
An ELISA kit is a commercially available set of reagents and precoated, blocked well strips designed to detect and quantify proteins, antibodies, hormones and other molecules in samples.
It works on the principle of antigen (the molecule to be detected) specific interaction with an antibody using enzyme conjugation as a detection method, which generates chromogenic or fluorogenic signal readouts.
Each ELISA kit contains a precoated plate, standards for a calibration curve, detection antibodies, an enzyme conjugate, a substrate solution, a stop solution, and a wash buffer concentrate. In aggregate, these components provide a lab with everything it needs to perform a quantitative assay without sourcing each reagent individually.
Since so many components are already pre-validated within the kit itself, most of the assay's performance is determined by how well those reagents were handled and how closely the protocol was followed, rather than by reagent quality alone.
There are four core ELISA formats, each applicable to different types of analytes and/or research goals.
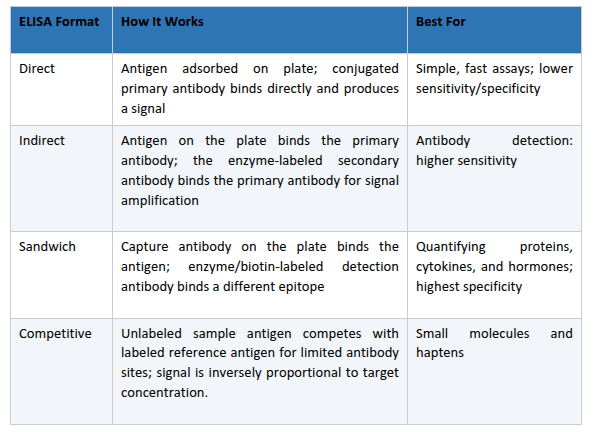

The workflow below applies to the sandwich ELISA format, which is the most widely used design in quantitative research kits. Follow each stage in sequence and refer to the specific insert included with your kit for volumes and incubation times, as these vary between products.
First things first. Get your reagents ready! After removing all kit components from storage, let them come to room temperature for at least 30 minutes. Cold reagents decrease enzyme activity and binding efficiency, thereby affecting signal output.
If you received lyophilized standards with your kit, reconstitute them following the instructions in the kit insert. Next, prepare serial dilutions from the standard to generate a standard curve. Usually, a curve will have seven or eight concentration points and a zero- calibrator well.
Sample preparation is one of the most important variables in any ELISA. Centrifuge blood-derived samples to obtain clear serum or plasma at the recommended speed and time. Dilute samples to within the kit's validated detection range; values below or above this range will not yield accurate results.
For cell culture supernatants, remove particulates by centrifugation. And for tissue lysates, be sure to perform a protein quantification step to ensure you load samples at similar total protein concentrations.
Pipette your standards, controls, and unknown samples into the appropriate wells, generally 100 microliters per well unless noted otherwise in the insert. Place the adhesive cover provided on top of the plate and incubate at 37 degrees Celsius for the time indicated in the protocol, usually 90 minutes to 2 hours.
During this interval, your target antigen in your samples binds to a capture antibody adsorbed to each well of the plate. After the incubation time has elapsed, flick out or aspirate contents from all wells completely and apply wash buffer vigorously to each well three to five times; after every step, wash thoroughly but do it quickly for high throughput.
Add the biotinylated detection antibody to each well and incubate again for the time stated in the protocol. After a second wash cycle, add the streptavidin-HRP (horseradish peroxidase) conjugate and incubate for approximately 30 minutes.
Streptavidin binds to biotin with extremely high affinity, anchoring the HRP enzyme to the detection antibody. This ensures that the signal generated in the next step is proportional to the amount of target antigen captured in each well.
To each well, add TMB (3,3',5,5'-tetramethylbenzidine) substrate solution. HRP converts TMB to a blue product. After a specified incubation time, add the stop solution to terminate the reaction; the blue color turns yellow.
Read absorbance at 450 nm with a microplate reader that has been calibrated using readings from the standard curve wells to generate a four-parameter logistic regression curve. Apply the generated standard curve to calculate the concentration of the target molecule for each sample.

The ELISA kit is a powerful tool for a variety of research and diagnostic applications and can be easily configured to measure almost any protein or antibody for which validated capture and detection antibodies are available.

You can follow an ELISA protocol step by step and still run into problems, but knowing the cause can save reagents, time, and samples.
Reproducible ELISA results aren’t about following the protocol quickly—it’s about getting each and every step right, time after time. Whether it’s how you handle your reagents or how well you wash and read your plates, small factors determine if your data will stand up or crumble.
Most unreliable results do not come from the kit, but from mistakes that can be avoided, like uneven washing or issues with timing during incubation. When these weaknesses are removed or minimized, ELISA is most likely the method you are looking for to get reliable quantification.
If you want to improve the consistency of your assay and obtain reliable ELISA solutions for your research and other complex lab workflows, we provide the highest quality products you can rely on.
Check our product range and resources and begin a future with consistent ELISA results.
1. What is the most important step in an ELISA protocol?
Washing is widely regarded as the most important step. Incomplete or inconsistent washing leaves unbound material in the well, which affects the background signal and therefore skews results more than pretty much any other variable in the protocol.
2. How many washes should I do between ELISA steps?
Most ELISA kit inserts recommend three to five wash cycles between major steps. It is better to go with the manufacturer's recommended number than to guess, as both underwashing and overwashing lead to incorrect results.
3. Why is my ELISA standard curve not linear?
It's usually due to a non-linear standard dilution series or standards that have degraded. Or the incubation times weren't followed exactly. Repeat the dilution series and/or carefully prepare new standards.
4. What causes a high background signal in an ELISA plate?
Incomplete washing, expired reagents, or nonspecific binding from blocking buffer are the usual suspects. However, cross-contamination between wells due to shared tips can also lead to higher background readings.
5. What is the hook effect in ELISA, and how do I avoid it?
The ‘hook’ effect can occur when antigen concentrations are so high that they saturate both the capture and detection antibodies, resulting in a low absorbance reading. This can be easily avoided by retesting diluted samples.
6. Can I freeze and reuse ELISA standards after reconstitution?
Most manufacturers advise against repeated freeze-thaw cycles, as the protein standards can degrade. Single-use aliquots stored at the recommended temperature will provide more reliable results across multiple runs.
7. How do I dilute samples for an ELISA kit?
Dilute samples with the diluent buffer provided in the kit, using the ratio mentioned in the insert. When the concentration is unknown, it's a good idea to run a couple of dilutions to ensure you are within the assay's linear range.
8. What is the difference between a sandwich ELISA kit and a competitive ELISA kit?
A sandwich ELISA kit uses two antibodies to capture and detect larger antigens, giving a signal proportional to target concentration. A competitive ELISA kit detects smaller molecules with an inverse signal—higher target levels result in lower color intensity.
9. How do I validate that my ELISA kit results are accurate?
First, check the standard curve; it should fit well. Spike recovery should be in an acceptable range. If you have a control sample, compare it with that as well. Also, make sure whatever you are measuring is consistent among replicate wells.
